World Map: From Idea to Shipped Feature (Devblog)
We’ve just launched v0.2 of Gimbal Cop, which introduces a new world map feature to the game. We wanted to add this map for a lot of reasons, mostly to drive home the fact that the game has a branching-difficulty campaign, and to let players switch between the levels they’ve unlocked, letting them switch to a harder or easier branch. I took some notes as I worked on the feature, and in this post I’ll go over some of the thought process, technical details, and lessons learned in developing a brand new feature, from idea to shipped.

Requirements:
Before jumping into the code, I sat down with a text file and determined what the requirements and assumptions were for the map.
- It must be dynamic, meaning that we can add more levels, reorder levels, etc, and the map will automatically reflect these changes and lay itself out without us having to keep it up-to-date.
- The map must display the path the player has taken through this run of the game, with the connections color-coded by difficulty.
- And it has to be interactive, letting the player switch levels and see stats about a level.
So, in retrospect (spoiler alert), how’d it go?
- Dynamic: Success! …Within the assumptions of the current setup of the campaign. The map can’t currently handle branches of different lengths, or offshoots / subbranches, and would totally crash (get stuck in an infinite loop) if we had any levels which connected back to earlier levels. I’m not sure that we’d want to, but it’s always good to consider these things.
- Display the path: Success! But, this path did introduce some complications…
- Let the players switch levels: The player can switch between the farthest unlocked levels, letting you switch from the hard branch down to the easy branch, or easy to medium, etc, which was the absolute requirement for the map. You can also unlock a level, retry the current level, and then open the map from the menu and skip ahead to that level you unlocked without having to finish the current level again. However, you cannot switch back to earlier levels, specifically because it would make the path logic and display much more complicated. I accepted this concession in order to keep from getting too behind schedule, but I’ve definitely got plans to add this functionality in a future update.
- Viewing stats on the level is the one requirement that simply wasn’t met at all in this iteration. I had a stats box in the map from the get-go, which was meant to display best times and high scores… and ultimately took it out in a scoping-down effort to wrap this feature up. We do have times and scores tracked behind the scenes, and have long meant to get high scores incorporated into various parts of the game, and when we do, we’ll also bring back the level stats in the map.
Tech (Nerd-stuff)
With the requirements known, it was time to jump into the code. This section is intended for anybody programming on a project, particularly in Unity, or curious to know how it works. In the next section, I’ll talk about the lessons I learned and relearned while working on this feature. If you’re not interested in the technical details, feel free to skip straight to the takeaways, which I hope will be valuable even if you aren’t a programmer or working with Unity.
Making the connections between levels accessible without loading the level scenes:

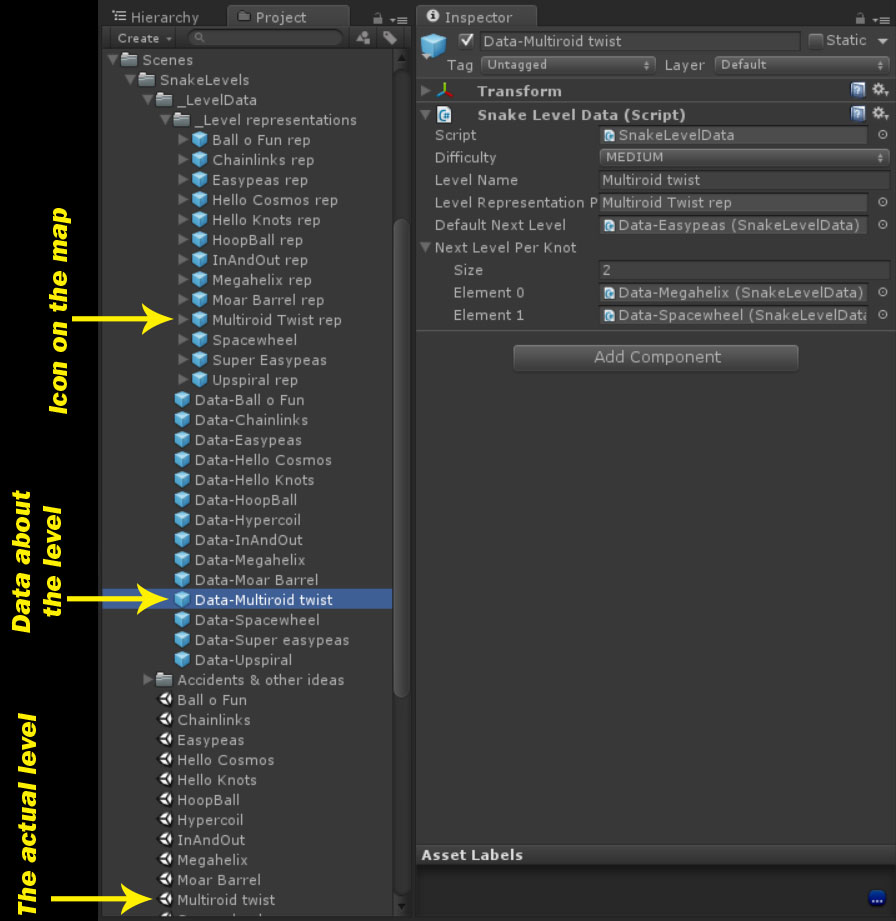
In Gimbal Cop, each level is its own Unity scene file (which is loaded into the single “the game” scene), with all of the level objects contained inside a GameObject with a SnakeLevel component, which holds all of the data for the knots and such:
Before this update, that SnakeLevel component also had fields for the default (easy) level to unlock for getting at least half the barrels, and the level to unlock for completing each knot. This worked well, but in order to fulfill the requirement of the world map that it be dynamic (automatically lay itself out by figuring out how the levels connect), having the connections in the SnakeLevels meant that we’d have to load each level to extract what levels it linked to. Not acceptable! We already had a SnakeLevelData component, which held the name and difficulty of the level and was used to link and color the knots. To let the map see how the levels connected, I moved the connections (Default (easy) Next Level and Next Level Per Knot) out of the SnakeLevel component (in the level scene) and into the SnakeLevelData component (on a prefab in the project).
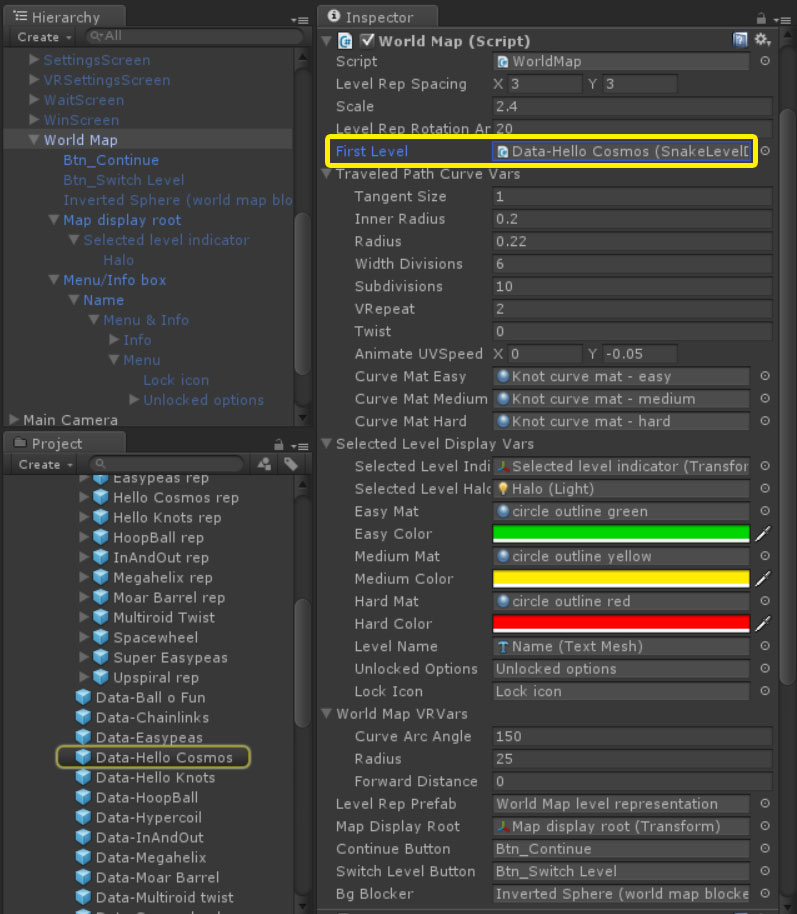
With the connections now held in the data objects rather than the levels themselves, I could provide ‘firstLevel’, the (data for the) level to start the map from, to the WorldMap component, and in that script crawl the level connections, create the visuals, and handle the input of the map.
(Also notice in that screenie my use of [System.Serializable] classes to hold variables, which is a great Unity technique to organize variables and keep your component’s inspector clean.)
Aha, necessary architectural changes are made, time to actually start the feature!
Picking the data structure
The first new technical task of the feature was to pick a data structure that would hold the map display data. In a linear game this would be a simple array, but in this case, we needed to support Gimbal Cop’s branching campaign, meaning that players can progress in two axes: from the beginning to the end of the game, and also from easy to hard in difficulty (branches). So maybe a 2D array would be our structure. But that wouldn’t work either, since the branching doesn’t start until after the first three levels, meaning there’s just one option for each of those levels, and after that point, there are two options for the fourth slice (column) of levels, then three options for the fifth and sixth slices of levels, and then two options again for the seventh (currently final) slice of levels, so the data structure needs to have a variable-sized second dimension. So maybe a List of Lists? Close, but still no cigar, since there are many ways to get to most of the levels (you can go from an easy to a medium level, or from a hard to that same medium level), and we can’t have the same level come up repeatedly when the connection-figuring-outing algorithm crawls through all the connections.
So the data structure I went with is a List of Sets, which actually aren’t native to .NET, but we’ve grabbed from Seth Peck, code here (.NET does have Hashtables and HashSets, but I find Peck’s Set class much more flexible). Since it’s a List, we can add a new entry for each slice of levels (parallel easy/medium/hard levels), and since the second dimension is a Set, we can add levels when they’re linked, without having to worry about duplicates. That algorithm looks like this:
public static List levelGraph = new List();
private void CreateLevelGraph() {
	levelGraph = new List();
	levelGraph.Add (new Set (firstLevel));
	while(true) {
		Set curSlice = new Set ();
		foreach(SnakeLevelData prevSliceCurLevel in levelGraph[levelGraph.Count - 1]) {
			if(prevSliceCurLevel.defaultNextLevel) {
				AddLevelToLevelGraph(curSlice, prevSliceCurLevel.defaultNextLevel);
			}
			if(prevSliceCurLevel.nextLevelPerKnot != null) {
				foreach(SnakeLevelData knotLevel in prevSliceCurLevel.nextLevelPerKnot) {
					AddLevelToLevelGraph(curSlice, knotLevel);
				}
			}
		}
		if(curSlice.Count == 0) break;
		levelGraph.Add (curSlice);
	}
	firstLevel.traveled = true;
	firstLevel.unlocked = true;
}
private void AddLevelToLevelGraph(Set slice, SnakeLevelData level) {
	slice.Add (level);
	level.traveled = false;
	level.unlocked = false;
}
Creating the display
With that List of Sets levelGraph data structure filled out (CreateLevelGraph is called on Awake), it was pretty easy to create the display of the map: iterate through the List to get each slice (X position), and iterate through all levels in that Set (slice) for the Y position. To put that more descriptively,
private void CreateLevelMapDisplay() {
	int sliceNum = 0, levelNumInSlice = 0;
	foreach(Set slice in levelGraph) {
		foreach(SnakeLevelData level in slice) {
			WorldMapLevelRepresentation levelRep = (Instantiate(levelRepPrefab) as GameObject).GetComponent();
			levelRep.transform.position = mapDisplayRoot.position + new Vector3(sliceNum * levelRepSpacing.x * scale, (levelNumInSlice * levelRepSpacing.y - ((slice.Count - 1) * .5f * levelRepSpacing.y)) * scale, 0); // The *.5f in y is to vertically center the slice (column of levels)
			levelNumInSlice++;
		}
		sliceNum++;
		levelNumInSlice = 0;
	}
}
Finishing
And then there’s the other 75-90%. Looking back through the git log, the feature took about 13 workdays, and was basically functional — the map was properly laying itself out and could load levels — after about 3 days. The following 10 days were spent tracking down and fixing bugs, mostly handling the different contexts the map could appear in: from the beginning of the game, at the beginning of a level (but not right after switching levels, since then you’d see the map twice in a row), from the menu, going back from the begin screen (the “Go” button before you start a level), and in VR (which has the most room for further improvement), as well as (much less) time spent simply iterating on the map and level icon design, and a good number of hours lost to weird Unity crashes and file corruptions I was getting at one point (woo!). There’s not too much technical wisdom to impart from this (majority) section that would be useful outside of the Gimbal Cop codebase, other than to save (commit) often, and to not let the bugs get the best of your morale…. but that’s best covered in:
Lessons Learned (and Re-learned)
The Last 10% Takes 90% of the Time.
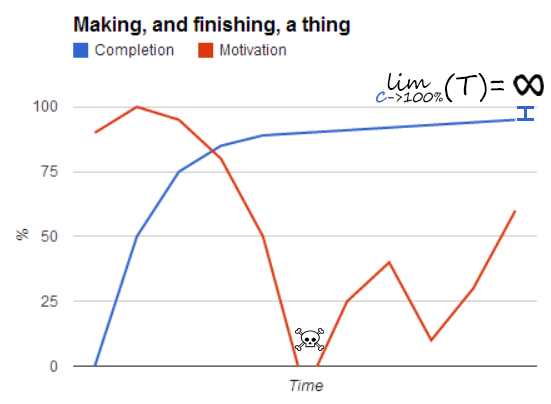
As I laid out at the end of the tech section, this feature followed the very common pattern where the core functionality came together very quickly, and the “finishing up” phase took at least three times longer. The real challenge in this situation is to not let the march through the bugs destroy morale: it’s easy to be motivated when just starting something, and even moreso when you quickly see it coming to fruition, but hard to stay motivated through the long slog of getting it bug-free and polished (and I’ll be the first to admit there’s still room to improve on both fronts for this map). I think the graph above describes pretty much every feature and project I’ve ever worked on (not to mention all those that didn’t make it out of the motivation valley).
The Simplest Solution is Often the Best.
Whether it’s because it’s awesome, or because it’s just the first thing to occur to us, the first solution programmers (or people in general) come up with for a problem is probably much more complicated than it has to be, and in my experience, a more simple solution often works just as well if not better, on top of being easier and faster to create and fix.
Working on the map, this lesson came up a number of times, in ways too specific to really be useful to enumerate, but every time I was struggling with a complicated problem, the solution was to stop thinking of it as a complicated problem and to find a simple alternative.
You’re Building a House of Cards.
In programming, and in my experience, for pretty much anything you do or create, you’re building a house of cards. If you don’t plan ahead or focus on creating a robust base that can handle whatever you might put on it, you’re gonna have a bad time. Working on Gimbal Cop’s world map reinforced for me just how true this programming axiom is, particularly when it comes to making concessions or accepting shoddy solutions and band-aids in the code: once you start making hacky concessions, they’ll cascade through the program.
Most notably in the map feature (and to get a little technical again), this cascade of crappiness came up when I was having a bug where, after the map was created, the code that should position it onscreen was totally screwing up and putting it way offscreen in a weird spot. We use this positioning system throughout the game, and it works well. I had no idea why it was screwing up here. But, I found that if I delayed the positioning by a fraction of a second, it would work fine (changing Unity’s Script Execution Order wasn’t an option here, since that caused much bigger problems). That delay fix was definitely weird and messy, but it worked, so I accepted it and moved on, making a note that I should fix it eventually. Later, as I set up the code that sets the display on the currently selected level, it got everything wrong, since it relied on the map already being positioned correctly. So I delayed that code too. Worked fine, great! Then I found that, if I opened the map from the pause menu, the position issue would happen again, since in that context the code wasn’t delayed. Ok, enough is enough. That delay bandaid, which gave me short-term relief to the bug I was having, was just covering up the problem, not fixing it, and the problem kept coming back, requiring more and more messy code each time I had to address it. So, at last, I committed myself to actually fixing the bug at its core and getting rid of all the band-aid code I had introduced. The source of the problem took a while to hunt down, but turned out to ultimately be a relatively simple fix, which let me get rid of piles of bandaid code, and ensuring the problem wouldn’t come back up again, and the crap cascade could stop. Moral of the story: fix the bug.
Well that about covers it, and I hope you found this useful or at least interesting. We hope to cover a number of our features in this tech-oriented devblog way, and will probably section off a “For Developers” corner of our site for code-heavy blog posts, as well as Unity tools and scripts, so let us know if you’d be into that, and keep your eyes open.
Also, play Gimbal Cop! Let us know on the feedback page how this map, and the whole game, works for you, what you do and don’t like, and what you’d like to see more of next time.
Thanks for reading!